Let me be straight with you: the first time I fired up an offset smoker, I made every mistake in the book. My smoke was thick and white. My temps swung 50 degrees in either direction. My brisket came out with a bitter, almost chemical edge that no amount of sauce could fix.
Sound familiar? You’re not alone.
An offset smoker has a reputation for being hard to master — and honestly, that reputation isn’t totally wrong. But “hard” doesn’t mean impossible. It just means you need to understand what you’re working with. Once you get the fire management piece dialed in, everything else follows.
In this guide, I’m going to walk you through everything: how an offset smoker works, how to season it before your first cook, how to build and manage your fire, how to get that beautiful thin blue smoke, and how to cook real food — brisket, ribs, pork shoulder — without pulling your hair out.
By the end, you’ll have the foundation to cook consistently great BBQ. Let’s get into it.
How Does an Offset Smoker Work?
Before you light your first fire, it helps to understand what’s actually happening inside the cooker.
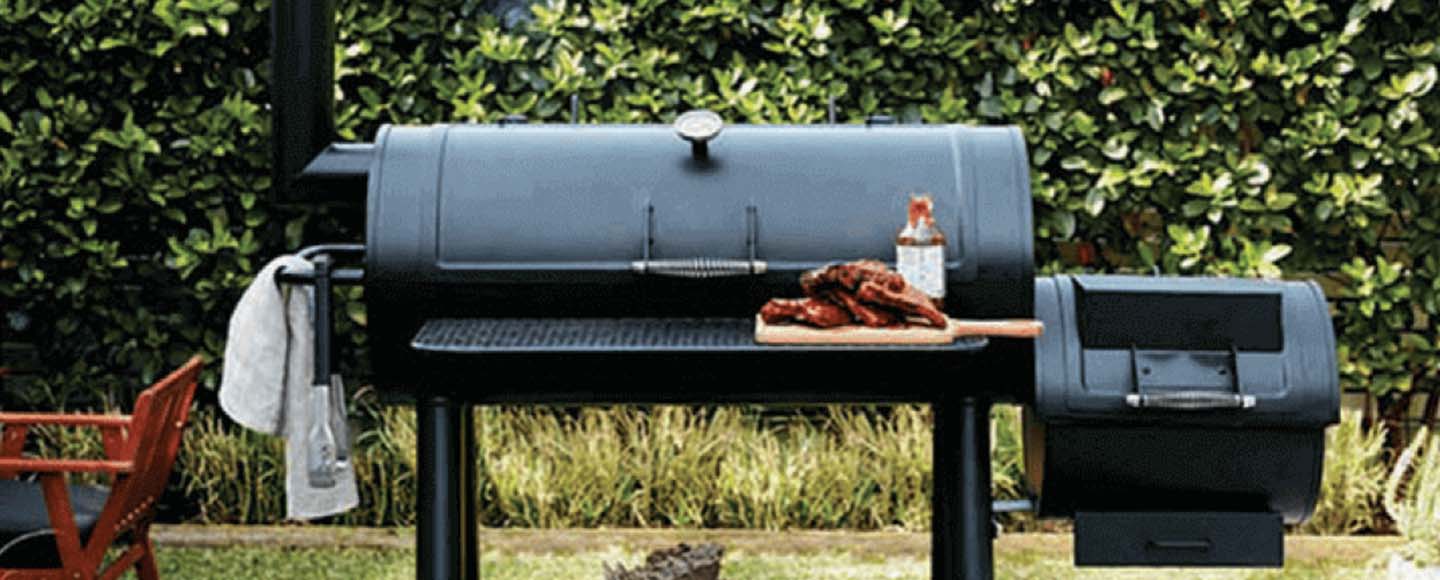
An offset smoker has two main chambers: the firebox and the cooking chamber. The firebox sits off to the side (hence the name “offset”) and is where you build your fire. The cooking chamber is the long horizontal drum where your meat goes.

Here’s the key: the heat and smoke from the firebox travel through a small opening into the cooking chamber, then exit through a chimney or exhaust stack on the opposite end. This means your food never sits directly over the flames. It cooks by indirect heat and smoke — low and slow.
That airflow path is everything. Control the airflow, control the temperature. Control the temperature, control the cook. It sounds simple because it is — once you’ve done it a few times.
Think of it like a river: the fire creates a current of heat and smoke that flows from the firebox, past your food, and out the chimney. Your job is to manage the speed and quality of that current.
How to Use an Offset Smoker for Beginners: Quick Start
If you’re doing your first cook and need the essentials fast, here’s the quick-start version. We’ll go deeper on each step below.
- Season your smoker before the first cook (coat interior with oil, run at 275°F for 2–3 hours)
- Light a chimney of charcoal and dump it in the firebox
- Add 2–3 wood chunks on top of the hot coals
- Open all vents fully to establish airflow
- Let the temperature stabilize between 225–275°F
- Place your food in the cooking chamber, away from the firebox
- Add a wood chunk every 45–60 minutes to maintain smoke and heat
- Monitor with a quality digital thermometer — not the lid gauge
The First Fire: How to Season Your Offset Smoker
Before you cook a single piece of meat, you need to season your offset smoker. This step gets skipped all the time by beginners, and it’s a mistake.
New smokers come with factory coatings, manufacturing oils, and protective finishes inside the metal. You do NOT want any of that touching your food. Seasoning burns all of it off and creates a protective patina on the metal that helps prevent rust and improves smoke flavor over time.
Step-by-Step: Seasoning Your Offset Smoker
- Wash the interior of the cooking chamber and firebox with warm soapy water. Rinse and dry thoroughly.
- Coat all interior metal surfaces — the walls, grates, and interior of the firebox — with a thin layer of a high smoke-point oil. Vegetable oil, canola oil, or Crisco all work well. Use a paper towel or brush to apply a thin, even coat. Don’t douse it.
- Build a small fire in the firebox using charcoal and a couple of wood chunks.
- Run the smoker at approximately 275°F for 2–3 hours with all vents open.
- Let it cool completely. The interior should now have a dark, slightly glossy finish.
You only need to do a full seasoning session once. After that, every cook adds another layer of that protective seasoning naturally.
Pro tip: If your smoker has been sitting outside unused for a month, give the grates a light re-oil before cooking. It takes two minutes and prevents rust from forming.
What You Need Before You Start
You don’t need a lot of gear to get started with an offset smoker, but a few key tools will make a huge difference — especially while you’re still learning the ropes.
Charcoal (Lump or Briquettes): Charcoal is your base fuel. It provides consistent heat without overpowering smoke flavor. I prefer lump charcoal because it burns hotter and cleaner, but quality briquettes work fine too. Avoid anything with lighter fluid already added.
Wood Chunks (Not Chips): For offset smoking, wood chunks are your main flavor source. They burn longer and more consistently than chips. I’ll cover wood selection in detail below.
A Chimney Starter: This is non-negotiable. A chimney starter lets you light charcoal quickly and safely without lighter fluid. It’s one of the best $20 investments you can make. I use mine every single cook.
Instant-Read Digital Thermometer: The lid thermometer on your offset smoker is almost certainly inaccurate — sometimes by 50°F or more. A quality instant-read probe thermometer is essential for monitoring actual meat temps and grate-level temps. The Thermapen is the gold standard, but there are solid budget options too.
Heat-Resistant Gloves: You’ll be handling hot grates, repositioning logs, and moving food. Get a decent pair of BBQ gloves rated for high heat.
A Water Pan: A simple aluminum pan filled with water placed inside the cooking chamber helps stabilize temps and adds moisture to the cooking environment. Big difference, especially on long cooks.
Having the right tools makes the learning curve 10x easier. A bad thermometer alone can ruin a 12-hour brisket cook. Don’t cut corners on the basics.
Step-by-Step: How to Use an Offset Smoker
Step 1: Prepare Your Smoker
Before every cook, take five minutes to get the smoker ready. It’ll make the whole session run smoother.
- Remove any old ash from the firebox. Accumulated ash restricts airflow and makes fire management harder.
- Check the grates. Give them a quick brush-down.
- Open all vents fully — both the intake damper on the firebox and the exhaust stack on the chimney. Airflow is everything, and you’ll want it fully open when you’re starting.
- Position your water pan inside the cooking chamber near the firebox end.
Step 2: Start the Fire with a Charcoal Base
This is where beginners often go wrong — they skip the chimney starter and go straight for lighter fluid. Don’t do it. Lighter fluid leaves a chemical taste in your food that doesn’t cook off as fast as people think.
Here’s how to use a chimney starter:
- Fill the chimney with charcoal — about three-quarters full is right for getting started.
- Place a couple of fire starters or crumpled newspaper under the chimney on a fireproof surface (or directly in the firebox bottom).
- Light the newspaper and let the chimney do its work. In about 15–20 minutes, the coals at the top will be ashed over and glowing orange.
- Dump the lit coals into the firebox.
Start with a medium-sized charcoal bed — enough to get heat going, but not so much that you overshoot your target temperature. You can always add more fuel. You can’t take it away.
A charcoal chimney is the single biggest upgrade most beginners can make. No fuss, no chemical taste, faster startup.
Step 3: Add Wood for Smoke Flavor
Once your charcoal base is going strong and your firebox has some heat in it, it’s time to add wood. This is where the real BBQ flavor comes from.
But before we get into technique, let’s talk about your fuel options and how they compare:
|
Fuel Type |
Burn Time |
Flavor Strength |
Best Use Case |
|
Wood Chunks |
Long (45–60+ min) |
Strong |
Primary smoking fuel — ideal for offsets |
|
Wood Chips |
Short (15–20 min) |
Mild |
Quick flavor boosts, charcoal grills |
|
Pellets |
Very Short |
Light |
Pellet grills only — not ideal for offsets |
Wood Chunks: The Primary Method
Wood chunks are the go-to fuel source for offset smokers, and for good reason. They’re fist-sized pieces of hardwood that burn slowly and consistently, giving you a steady stream of smoke without requiring constant attention.
Place 2–3 chunks directly on top of your lit charcoal when you first set up the fire. From there, add another chunk every 45–60 minutes as needed. You don’t need to soak them — that’s an old myth. Dry chunks produce cleaner, better smoke.
For beef (brisket, ribs), oak and hickory are classics. For pork, I love cherry or apple mixed with a little hickory. For chicken and fish, something milder like cherry or pecan works beautifully.
Wood Chips: When to Use Them
Wood chips aren’t really designed for offset smokers — they burn too fast and require constant refueling. But they have their place: if you’re looking for a quick burst of smoke flavor on a shorter cook (like chicken thighs or fish), a handful of chips can work.
If you do use chips in an offset smoker, place them in a smoker box or wrap them in foil with a few holes poked in it. This slows down their burn time and makes them a little more manageable.
Pellets: Keep It Brief
Pellets are designed for pellet grills with automatic auger systems, not for offset smokers. In an offset, they burn extremely fast, produce little sustained smoke, and can be difficult to manage consistently.
If you want to experiment, use a smoker box and add small amounts at a time. But honestly? Stick to chunks. You’ll get much better results with less hassle.
Step 4: Preheat and Stabilize Temperature
Once your fire is going and wood is on, close the cooking chamber lid and give the smoker 20–30 minutes to preheat and stabilize.
Your target temperature for most low-and-slow cooks is 225–275°F at grate level. I usually aim for around 250°F for brisket and pork shoulder, and 250–275°F for ribs.
During this time, don’t open the lid repeatedly to check things. Let the heat build and stabilize. Every time you open the lid, you drop the temperature and disrupt the airflow pattern inside the cooking chamber.
Water Pan Tip: Place an aluminum pan filled with water or apple juice on the cooking grate near the firebox. The liquid absorbs and radiates heat, helping to smooth out temperature swings. It also adds moisture that keeps your meat from drying out — especially on long cooks like brisket.
Step 5: Offset Smoker Vent Settings Explained
The vents are your temperature control system. Once you understand how they work, managing heat becomes much more intuitive.
Your offset smoker has two main vents:
Intake Damper (Firebox): This is the vent on the firebox that controls how much oxygen reaches the fire. More air = more combustion = more heat. Restrict it and your fire burns cooler and slower.
Exhaust Damper (Chimney): This is the vent on or near the chimney that controls how much smoke exits the cooker. Keep this one wide open for most of your cook. Closing the exhaust traps smoke inside and leads to bitter, creosote-flavored meat.
Here’s the beginner baseline to start with:
- Intake damper: 50% open
- Exhaust damper: 100% open (always)
From there, adjust the intake damper based on temperature. Running too cool? Open it more. Running too hot? Partially close it. Make small adjustments and wait 5–10 minutes to see the effect before touching it again. Patience is key.
Rule of thumb: Always control temperature through the intake damper. The exhaust should stay fully open during the entire cook to ensure clean smoke flow.
Step 6: Place Your Food Correctly
Placement matters more than most beginners realize. Here’s what you need to know:
Use the indirect zone: Your food should be in the cooking chamber, not the firebox. The hottest zone is nearest the firebox opening — this is where smaller, faster-cooking items (like sausage or chicken pieces) can go. Larger cuts like brisket and pork shoulder should be positioned toward the middle or far end of the cooking chamber.
Fat side positioning: On cuts like brisket, most pitmasters position the fat cap facing the heat source. As it renders, it bastes the meat and provides some protection from the direct radiant heat coming through the firebox opening.
Avoid hot spots: Every offset smoker has hot spots, usually closest to the firebox. Over time you’ll learn where yours are. Rotating your meat halfway through the cook is a good practice until you know your smoker’s hot zones.
Step 7: Maintain the Fire Like a Pro
This is the heart of offset smoking — and where most beginners struggle. Fire management isn’t difficult once you understand what you’re looking for, but it does require attention.
A few core rules:
- Add fuel every 30–45 minutes, or when you see temps starting to drop. Don’t wait until the fire is dying — adding fuel to a nearly-dead fire produces dirty smoke.
- Add one piece of wood at a time. Dumping in three or four chunks at once creates a temperature spike and can produce white smoke.
- Keep the fire small and consistent. A small, hot, clean fire is always better than a large, smoldering mess.
- Pre-light your wood chunks before adding them. You can lay a chunk on top of the firebox lid for a few minutes to warm it up before adding it inside. This reduces the amount of white smoke produced when a cold, wet log hits a fire.
The Holy Grail: Blue Smoke vs. White Smoke
This is probably the most important concept in offset smoking. It’s also the one that trips up the most beginners.
Thin blue smoke is what you want. It’s almost invisible — a faint wisp of translucent blue or gray coming out of the chimney. This is clean combustion. It imparts a beautiful, complex smoke flavor into your meat.
Thick white smoke is what you don’t want. Billowing white clouds coming out of your chimney mean incomplete combustion. The wood isn’t burning cleanly, and it’s producing creosote — a bitter, acrid compound that coats your meat and ruins the flavor.
Here’s what causes white smoke and how to fix it:
- Too much wood at once: Add smaller amounts more frequently.
- Green or unseasoned wood: Only use properly dried, seasoned hardwood.
- Poor airflow: Make sure your exhaust vent is fully open and your intake damper isn’t too restricted.
- Low fire temperature: A smoldering fire produces dirty smoke. Get the fire burning hot and clean, then settle it into your target temp range.
If you see white smoke: open the intake damper fully, add a small piece of dry wood, and give it a few minutes. Once the smoke clears to thin and blue (or nearly invisible), you’re in business.
Step 8: Monitor Your Cook
Once everything is dialed in, your job is to monitor and make small adjustments as needed. Here’s how to do it right:
- Use your digital thermometer — both for the grate-level ambient temperature and for the internal temp of your meat. Don’t trust the lid gauge.
- Check the fire every 30–45 minutes. A quick peek into the firebox tells you everything: Is the fire burning hot and orange? Good. Is it smoldering gray and dim? Add fuel and open vents.
- Don’t open the cooking chamber lid more than necessary. Every time you peek, you drop the temp and lose valuable heat and moisture.
- Keep a log on your first few cooks. Write down the time, temperature, what you added, and any adjustments you made. This speeds up the learning process dramatically.
The Stall: What It Is and How to Beat It
If you’re smoking a large cut of meat like brisket or pork shoulder, you’re going to hit the stall. This is one of the most frustrating things for new pitmasters, but once you understand it, it’s totally manageable.
The stall happens when your meat’s internal temperature plateaus — usually somewhere around 150–170°F — and seems to stop rising. It can stay stuck there for 2, 3, even 4 hours. This happens because the moisture in the meat is evaporating off the surface, and that evaporation cools the meat at the same rate the smoker is heating it. Your smoker is basically fighting itself.
The fix: the Texas Crutch. Wrap your meat tightly in heavy-duty aluminum foil or pink butcher paper when it hits the stall. This stops the evaporation cooling effect and lets the internal temperature start climbing again.
Foil creates a tighter seal and speeds things up more dramatically. It also softens the bark (the crust on the outside).
Butcher paper is more breathable. It still helps push through the stall but preserves a firmer bark. Most serious brisket cooks prefer this.
After wrapping, put the meat back in the smoker and let it cook until it hits your target internal temp: 203–205°F for brisket, 200–205°F for pork shoulder. Then rest it for at least an hour before slicing.
Special Use Cases
How to Use an Offset Smoker on a Charcoal Grill
Some charcoal grills come with an offset firebox attachment or a side smoker chamber as a combo unit. Products like the Char-Griller Duo and similar combo grills let you use one side as a direct charcoal grill and the other as an offset smoking chamber.
Using these is essentially the same process as a dedicated offset smoker — you’re still managing the fire in the side firebox and using indirect heat in the main cooking chamber. The main difference is that combo units tend to be smaller and less insulated, so they require more frequent fire tending and can struggle to hold temps in cold or windy weather.
How to Use a Vertical Offset Smoker
A vertical offset smoker has the firebox on the side at the bottom, with the cooking chamber stacking vertically above it. You’ll see these from brands like Royal Gourmet and similar manufacturers.
The main difference with vertical units is airflow and heat rise. Because heat naturally rises, vertical smokers often heat up faster and can run hotter at the top of the cooking chamber than at the bottom. Rotate your food between rack levels during the cook to even things out.
The fire management principles are the same: small, clean fire, wood chunks as your smoke source, and exhaust vents fully open.
Brand-Specific Tips
How to Use a Char-Broil Offset Smoker
Char-Broil’s offset smokers are popular entry-level options — affordable and widely available. The biggest thing to know: they tend to run leaky. Air gets in through the gaps in the lid and door seals, which makes temperature management more difficult.
The fix is simple: pick up some high-temp gasket tape (the same stuff used on wood stoves) and seal the cooking chamber lid. It makes a noticeable difference in how consistently the smoker holds temperature. Also, the stock thermometer is notoriously inaccurate — definitely replace it with a proper digital probe.
How to Use an Oklahoma Joe’s Offset Smoker
Oklahoma Joe’s smokers — particularly the Highland and the Longhorn — are the most popular entry-to-mid-range offset smokers on the market, and for good reason. They’re built heavier than most budget options and hold temperature reasonably well out of the box.
That said, the Highland in particular benefits from sealing the gaps around the firebox-to-cooking-chamber connection with high-temperature RTV silicone or gasket tape. This small mod significantly improves temperature control and reduces how often you need to tend the fire.
The reverse flow baffle (on the Longhorn and some other models) helps even out the cooking temperature across the grate — no major hot spots. If you’re buying your first serious offset smoker, an Oklahoma Joe’s is hard to beat at the price point.
How to Use a Royal Gourmet Offset Smoker
Royal Gourmet makes both horizontal and vertical offset smokers at budget-friendly prices. They’re solid starter units, especially for someone who wants to learn the craft without a major upfront investment.
The vertical models in particular are worth noting. Because of their design, they tend to develop more significant temperature variance between cooking levels, so plan on rotating your food up and down during longer cooks. Sealing any gaps in the lid and door with high-temp tape is worth doing here too.
How to Use a Char-Griller Offset Smoker
The Char-Griller Smokin’ Pro is one of the best-selling offset smokers for beginners and a genuinely capable cooker for the price. Like most budget offsets, it runs a little leaky and benefits from sealing mods.
One popular mod for the Char-Griller is the exhaust extension mod: attach a length of dryer vent duct to the exhaust chimney so it extends down to grate level inside the cooking chamber. This forces the smoke to travel across the entire grate before exiting, which dramatically improves temperature consistency from one end of the cooking chamber to the other. It’s cheap, easy, and makes a real difference.
Common Offset Smoker Mistakes (And How to Avoid Them)
Thick white smoke: The most common mistake. Fix your fire: smaller, hotter, cleaner combustion. Get the fire burning bright and orange before closing things down.
Overloading wood at once: Dumping in three or four chunks at once spikes temps and creates dirty smoke. Add one piece at a time and let it establish before adding more.
Closing vents too much: Restricting airflow — especially the exhaust — traps smoke and causes bitter flavor. Keep the exhaust wide open.
Not preheating the smoker: Throwing food on before the smoker is up to temp means your food sits in a low-temp environment longer and picks up more unclean smoke early in the cook.
Ignoring the fire and playing catch-up: Letting your fire die out completely and then scrambling to add fuel creates a messy temperature swing. Check your fire every 30 minutes. Small, consistent additions are far better than emergency interventions.
Trusting the lid thermometer: The built-in gauges on most offset smokers are notoriously inaccurate. Always use a digital thermometer at grate level.
Best Foods to Cook in an Offset Smoker
An offset smoker is designed for low-and-slow cooking, which means it excels with large, tough cuts that benefit from long cooking times and smoke. Here’s where it really shines:
Brisket: The king of offset smoking. A whole packer brisket (12–16 lbs) at 250°F takes 10–14 hours. The payoff is incredible. See our full brisket guide for detailed instructions.
Pork Shoulder / Boston Butt: Forgiving to cook, deeply flavorful, and great for pulled pork. 8–12 hours at 250°F. A great starting point for beginners.
Ribs: Spare ribs and baby back ribs are both excellent in an offset. Spare ribs take 5–6 hours, baby backs run 4–5 hours at 250°F. See our rib guide for the 3-2-1 method.
Whole Chicken and Turkey: Poultry cooks much faster than beef or pork and is a great way to practice fire management without an all-day commitment.
Sausage and Hot Dogs: Seriously underrated on the offset. Position them closer to the firebox for higher heat, and they’re done in 45–60 minutes. Great practice cooks.
Offset Smoker Cooking Times Cheat Sheet
These are estimates based on cooking at 250°F. Always cook to internal temperature, not time — every piece of meat is different.
|
Meat |
Target Temp |
Estimated Time |
Notes |
|
Brisket (whole packer) |
203–205°F |
10–14 hours |
Rest 1–2 hours wrapped before slicing |
|
Pork Shoulder |
200–205°F |
8–12 hours |
Texas crutch recommended |
|
Spare Ribs |
195–203°F |
5–6 hours |
3-2-1 method works great |
|
Baby Back Ribs |
195–203°F |
4–5 hours |
More forgiving than spare ribs |
|
Whole Chicken |
165°F |
3–4 hours |
Split the bird for more smoke penetration |
|
Whole Turkey |
165°F |
6–8 hours |
Spatchcock for faster, more even cooking |
|
Pork Ribs (St. Louis) |
195–203°F |
5–6 hours |
Trim the skirt before smoking |
Cleaning and Maintenance
Taking care of your offset smoker isn’t complicated, but it does matter — especially if you want it to last.
After each cook, let the smoker cool completely, then:
- Remove and discard ash from the firebox. Ash absorbs moisture and accelerates rust.
- Brush the grates with a wire brush while they’re still slightly warm. Built-up grease is easier to remove before it fully hardens.
- Wipe down the inside of the cooking chamber with a dry cloth. You don’t need to scrub it — that black patina is your seasoning layer. Just remove excess grease drippings.
- Lightly coat the interior metal surfaces with a thin layer of oil before storing. This is especially important if the smoker will be sitting unused for more than a week or two.
- Cover the smoker when not in use. A quality weather-resistant cover makes a huge difference in how long the exterior holds up.
Once a season (or whenever you notice rust starting to form), re-season the interior by repeating the oil-and-heat process from your initial seasoning. It only takes a couple of hours and extends the life of your smoker significantly.
Best Offset Smokers for Beginners
If you’re still shopping for your first offset smoker, here’s where I’d point you:
Budget King: Char-Griller Smokin’ Pro
The Smokin’ Pro is one of the most popular budget offset smokers out there, and it earns it. For under $200, you get a decent-sized cooking area, a side firebox, and enough build quality to learn on. It will benefit from the exhaust extension mod and some gasket sealing, but it’s a solid starting point.
Best for: Someone who wants to try offset smoking without a big financial commitment.
Entry-Level Workhorse: Oklahoma Joe’s Highland
The Highland is the sweet spot between price and performance for most beginners. It’s heavier gauge steel than the budget options, holds temperature better, and is one of the most widely used offset smokers in the country. Seal the gaps, replace the thermometer, and this thing will cook great BBQ for years.
Best for: Someone who’s serious about learning and wants a smoker that will grow with them as they improve.
Buy Once, Cry Once: Old Country BBQ Pits (Pecos or Brazos)
If you want to skip the budget smoker phase entirely and go straight to something that will last a lifetime, Old Country BBQ Pits from Academy Sports makes some of the best value-for-money heavy-gauge offset smokers available. The Pecos and Brazos models use thick steel construction, and the difference in heat retention and consistency is immediately noticeable compared to thin-walled budget smokers.
Best for: Someone who knows they’re in this for the long haul and wants to invest once in a quality cooker.
If you want an easier learning curve, these are the most beginner-friendly options. A better smoker holds temperature more consistently, which means less frustration while you’re still learning fire management.
Essential Accessories
Chimney Starter: As mentioned earlier — this is non-negotiable. Weber makes the most popular one and it’s worth every dollar.
Instant-Read Thermometer: The Thermapen MK4 is the gold standard. For a more budget-friendly option, the ThermoPop or the Lavatools Javelin Pro are excellent. Don’t cheap out here — your thermometer directly affects the quality of every cook.
BBQ Gloves: Look for gloves rated to at least 500°F. You’ll be repositioning hot grates, handling smoking chunks, and possibly wrapping hot briskets. Good gloves protect your hands without sacrificing grip.
High-Temp Gasket Tape: If you have a budget offset smoker, this is one of the best $10 you can spend. Sealing the lid and door gaps dramatically improves temperature control.
Wireless Thermometer: Once you’re doing longer cooks, a wireless probe thermometer (like the ThermoWorks Smoke or Signals) lets you monitor temps from inside the house without babysitting the smoker constantly. Game changer for 12-hour brisket cooks.
Frequently Asked Questions
Is an offset smoker hard to use?
It has a learning curve, but it’s not as hard as its reputation suggests. The core skill is fire management, and that’s something most people get comfortable with after a few cooks. The key is understanding how airflow, fuel, and wood interact — and this guide gives you that foundation.
How do you keep temperature steady in an offset smoker?
Keep a small, consistent fire rather than a large, unruly one. Add fuel proactively every 30–45 minutes. Use a water pan to buffer against temperature swings. Keep the exhaust wide open and adjust temperature using only the intake damper. Patience is the secret — let things stabilize before making more adjustments.
What is the best fuel for an offset smoker?
Charcoal as your base fuel, with hardwood chunks as your smoke source. Lump charcoal burns cleaner and hotter; briquettes are more consistent. For wood, the choice depends on what you’re cooking: oak and hickory for beef, cherry and apple for pork, pecan for a mild, versatile option.
Why does my BBQ taste bitter?
Bitter flavor almost always comes from thick white smoke — creosote deposits from incomplete combustion coating your meat. Fix the smoke before you put the food on. Get a clean, hot fire established first, and only add wood once the smoke is thin and blue (or nearly invisible).
Can I use pellets in an offset smoker?
Technically yes, but they’re not well-suited for offset smokers. Pellets burn too fast, produce minimal smoke output in a traditional firebox, and require constant refueling. Stick to wood chunks for the best experience. If you want the convenience of pellets, a dedicated pellet grill is a better tool for that job.
How long does it take to cook brisket in an offset smoker?
A whole packer brisket (12–16 lbs) typically takes 10–14 hours at 250°F. The wide range is because every brisket and every smoker is a little different. Always cook to internal temperature — you’re looking for 203–205°F in the thickest part of the flat — not to a specific time. Budget extra time and remember that resting the brisket for 1–2 hours after the cook is just as important as the smoke itself.
How often should I add wood to my offset smoker?
In general, add one chunk of wood every 45–60 minutes during active smoking. If your temps are dropping, that’s usually a sign your charcoal base needs attention more than your wood supply. Check the firebox and add charcoal first, then wood if needed.
Do I need to soak wood chunks or chips before using them?
No. This is a persistent myth. Soaking wood does not produce more or better smoke — it just delays the burn while the water steams off first. Dry wood produces cleaner, more consistent smoke. Skip the soaking step entirely.
Final Thoughts: You’ve Got This
Look, offset smoking has a learning curve. I’m not going to pretend otherwise. Your first cook might not be perfect. Your first brisket might be a little dry, your smoke might get away from you, and your temps might bounce more than you’d like.
That’s okay. That’s part of it.
The guys who become great pitmasters aren’t the ones who never made mistakes — they’re the ones who paid attention to their mistakes and adjusted. Keep your fire small and clean. Chase the blue smoke. Use a real thermometer. Add fuel before you need to, not after your fire dies.
Do those things consistently, and you’ll be turning out BBQ that makes your neighbors knock on the door every weekend.
Now go light that chimney.
Key Takeaways: Season your smoker before the first cook. Build your fire with charcoal and hardwood chunks. Keep your exhaust vent fully open. Chase thin blue smoke, not thick white smoke. Cook to internal temperature, not time. Embrace the stall with the Texas Crutch. And most importantly — have fun with it.